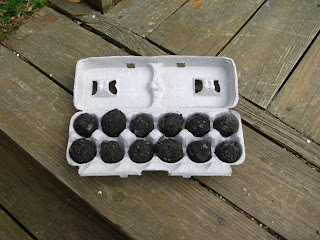
If there was to be a symbol that represents the Guerrilla Gardening movement, the seed bomb just might be it.
Easy to make, transport and plant, we can think of no better way to use old and excess seeds.
But first, a few rules:
- DO NOT use seeds from harmful, poisonous or invasive species of plants and flowers. We want people to embrace the surprise, not be pissed they now have a vine-covered wall, tree, etc.
- DO NOT inflict damage when planting your bombs. Public parks, established landscaping at businesses and your neighbor's yard should be avoided. Look for places that need it: alleys, little patches of dirt, neglected window boxes, etc.
- Stay organic! Please refrain from using chemical fertilizers or genetically modified seeds.
We understand that trespassing may be part of the deal, but please do not go out breaking any serious laws. Don't be an ass; show the people that your trespassing was worth it.
Let's get started. Items needed:
- Good quality, organic soil
- Compost
- Non-toxic air-dry clay (we prefer powder)
- Seeds
A note on seeds: It's best to stick with low-maintenance flowers or herbs. Sunflowers, bee balm and various wildflowers are our favorites and we like to use up our "old" seeds (harvested/purchased 3+ years ago). Edibles are generally avoided unless you plan on tending the garden regularly; please do not let the food rot or go to waste.
Directions:
1. Mix: In a large bowl or bucket, mix a 1:1 ratio of soil and compost. Add enough water so the mixture will hold form when squeezed in your hand. Add clay, small amounts at at time until mixture just begins to have a clay-like feel to it. You will probably need to add more water during this step, too. The clay will keep your bombs from falling apart; too much and your seeds will never be able to germinate.
2. Shape: Scoop up a small handful of your mixture, add some seeds and shape yourself a bomb, about the size of a golf ball. Try to keep the seeds in the center of the bomb. Some people will add all of the seeds during Step #1, mixing everything at once. This is fine for larger, visible seeds, but it may be difficult to guarantee all of your bombs contain seeds if using ones that are tiny and dark.
3. Dry: Place your bombs on a counter top or out in the sun to dry. Clay usually needs 24 hours to cure.
4. Plant: Package your bombs up and get to work! If you're worried that too much clay was used, crumble the bomb by hand instead of planting whole.
5. Enjoy: Take note as to where you planted and visit often.
If you're in Charlotte and know of a place that could benefit from a bomb or two (or ten), send us an email.
Have you planted seed bombs?
Add your photos to our Flickr group! We'd love to see them.


No comments:
Post a Comment